xCloud Backup Setup for Ugreen
Step-by-Step Guide
In the Ugreen Web Interface
1. Access the NAS web interface (typically http://[local NAS IP address]:9999)
Info
By default, it's available on the NAS IP address (find this in your home router's web interface) on port 9999, e.g., http://192.168.178.50:9999.
2. Open the system control panel
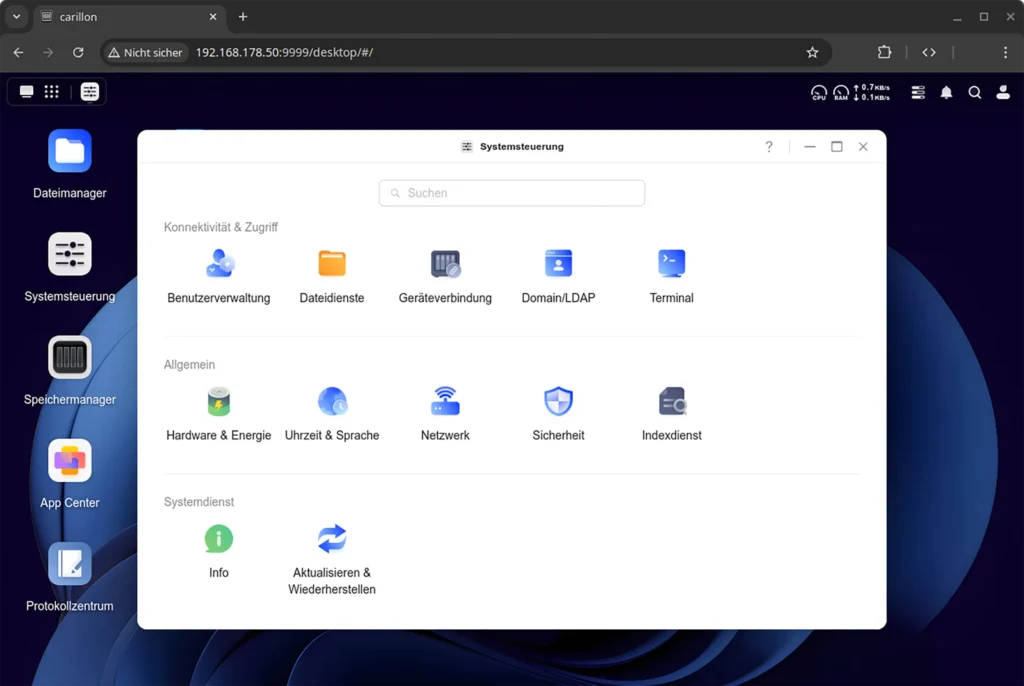
3. Go to "System Control" > "Connectivity & Access" > "Terminal"
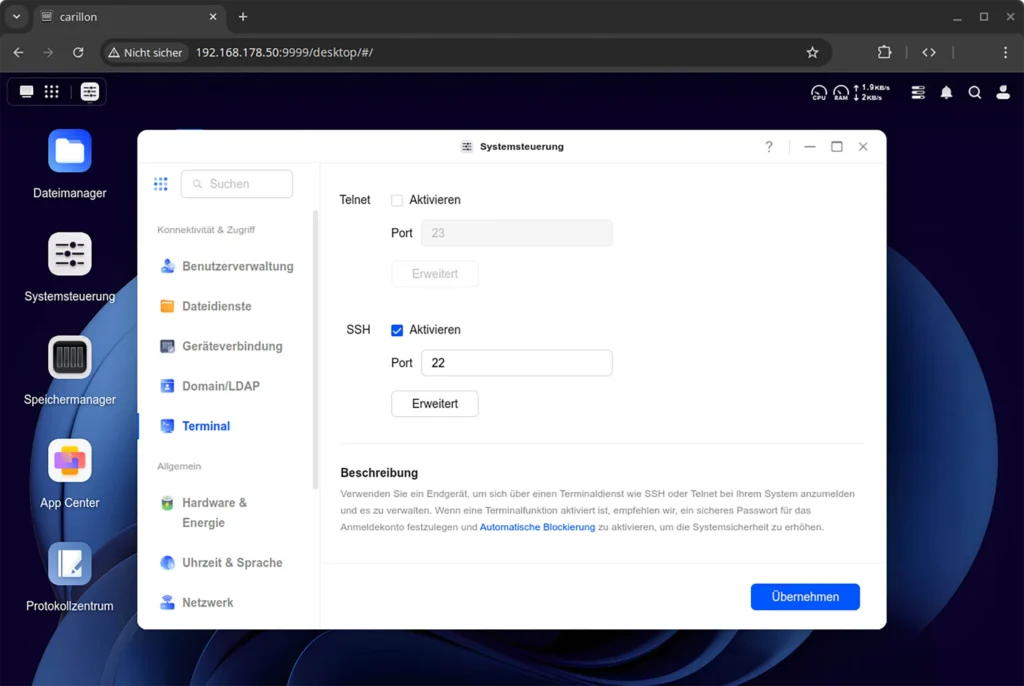
4. Enable SSH
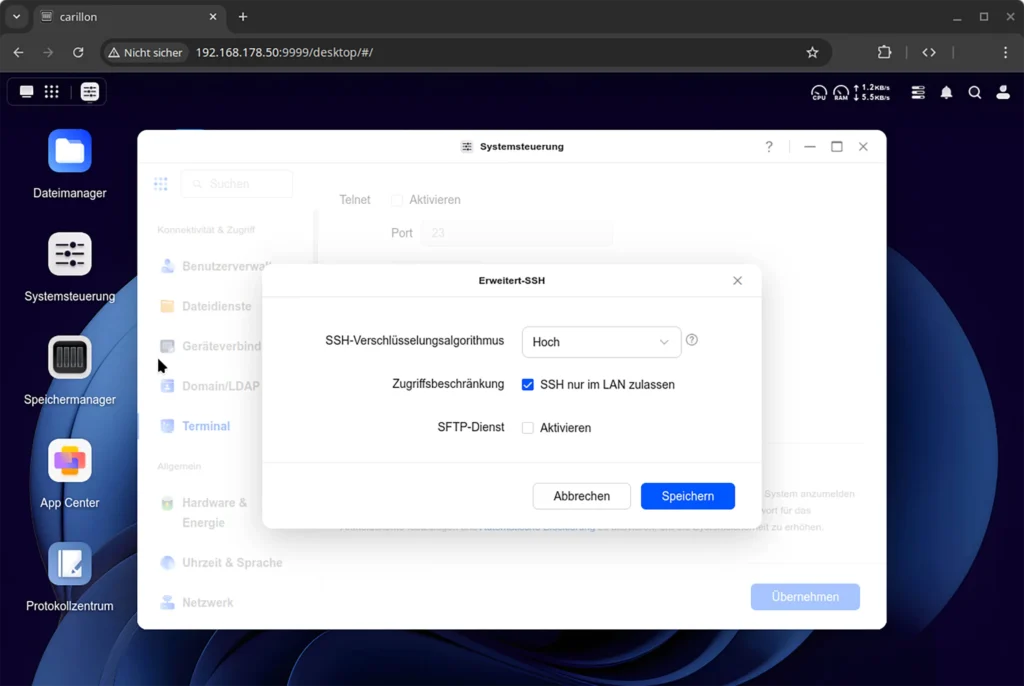
- Keep the default port 22
- Recommended: Set encryption to "High"
- Restrict SSH to LAN access
5. Close the dialog by clicking the "Apply" button.
On Your Computer
6. Open the terminal/PowerShell
7. Log in via SSH using the Ugreen NAS credentials and IP address from step 1 (example username is "johndoe", enter password interactively):
ssh johndoe@192.168.178.50
johndoe@192.168.178.50's password:
[...]
johndoe@ugreen-nas:~$
8. Install the two packages restic (the backup client) and apg (password generator), confirm by pressing Y and Enter when prompted:
sudo apt install restic apg
[...]
Do you want to continue? [Y/n]
[...]
Processing triggers for man-db (...)
johndoe@ugreen-nas:~$
9. Create a strong password for backup encryption using apg. Then make the file readable only by the current user with the chmod command.
apg -a 1 -m 32 -n 1 -M NCL > password-file
chmod 600 password-file
10. Using a text editor (nano, vim, etc.), create a script named xcloud-backup.sh with the following content. Replace the two placeholders <xCloud Backup … Key> with the corresponding credentials from the xCloud Backup web application:
#!/bin/sh
export AWS_DEFAULT_REGION="eu-west-1"
export RESTIC_REPOSITORY="s3:https://backup.de.xcloud.eu/backup"
export AWS_ACCESS_KEY_ID="<xCloud Backup Access Key>"
export AWS_SECRET_ACCESS_KEY="<xCloud Backup Secret Key>"
export RESTIC_PASSWORD=$(cat password-file)
11. Make the script executable using the chmod command. Then run the script so that its environment variables are loaded into your current terminal session (the single dot is part of the command):
chmod +x xcloud-backup.sh
. ./xcloud-backup.sh
12. Now you can initialize an encrypted repository in the bucket. The command automatically uses the contents of the "environment variables" set by the script.
restic init
created restic repository 01ab2c34de at s3:https://backup.de.xcloud.eu/backup

Please note that knowledge of your password is required to access
the repository. Losing your password means that your data is
irrecoverably lost.
Key Storage
This message from Restic refers to the contents of the password-file. This should be backed up separately locally, e.g., on a USB stick. Without the password, the backup content cannot be decrypted.
13. For testing, you can now back up a single file:
restic --verbose backup example_file.txt
[...]
processed 1 files, 325 B in 0:00
14. If this worked, you can list the folders that should actually be backed up and add them at the end of the xcloud-backup.sh file created above as the last command, for example:
restic backup \
/home/johndoe \
/volume1/@appstore
A complete backup script could look like this:
#!/bin/sh
export AWS_DEFAULT_REGION="eu-west-1"
export RESTIC_REPOSITORY="s3:https://backup.de.xcloud.eu/backup"
export AWS_ACCESS_KEY_ID="<xCloud Backup Access Key>"
export AWS_SECRET_ACCESS_KEY="<xCloud Backup Secret Key>"
export RESTIC_PASSWORD=$(cat password-file)

restic backup \
   /home/johndoe \
   /volume1/@appstore
15. To run the backup automatically on a time-controlled basis, you can configure daily execution through cron:
sudo crontab -e
In the opened text file, add the following line for example:
0 3 * * * /home/johndoe/xcloud-backup.sh
would start the script daily at 3:00 AM.
Additional Resources
- Official restic documentation, especially the articles
- Backing up, to better understand the snapshot mechanism, and
- Restoring from backup, to prepare for emergencies
- Ugreen Knowledge Center, article Netdisk, the application that could be used for cloud synchronization in the future.